
SewCalGal is delighted to have Joanne Mitchell share with us a wonderful tutorial for Free-Motion Quilting, as part of our 2013 FMQ Challenge. Before we go over Joanne's tutorial, I want to share a few insights about Joanne, for those of you that may not know her.
Joanne is a very talented woman who hosts three blogs:
- Joanne of Thread Head, is a wonderful blog packed full of tutorials, tips and inspiration.
- The FMQ Challenge, which is a blog dedicated to FMQ, AND
- Joanne's 365 Days, where Joanne captured 365 days in a photo journal blog.
Joanne lives in Manitoba, Canada and grew up in a family where her mother, aunts, grandmother and even great-grandmothers sewed and made quilts! She loves to teach and is willing to travel to teach at you local quilt shop or quilt guild. She also participated in our 2012 FMQ Challenge, completing all 12 of the Monthly Challenges, plus all four of the bonus tutorials! And she did an spectacular job on each one. SewCalGal (and others too) were always inspired to see Joanne's FMQ entries.
Those that follow Joanne's Thread Head blog know that Joanne does an excellent job with free-motion quilting. And, her feathers are absolutely stunnning. And she has shared many great tutorials on her blog too! Thus, SewCalGal was jumping with Joy when Joanne volunteered to provide us a tutorial on FMQ Feathers, for our 2013 FMQ Challenge. This tutorial is well written with excellent photos and provides insights on a variety of feather designs that you can practice and make your own.
Joanne and SewCalGal hope you enjoy this tutorial.
Feathers by Joanne of Thread Head

Developing Your Own Unique Style for Free Motion Quilted Feathers
Just like signatures, we all develop our own style of free motion quilted feathers. This tutorial is to make you look at different styles of feathers, to figure out what you like and then try quilting some feathers to work on your own unique style.
Anatomy of a Feather -
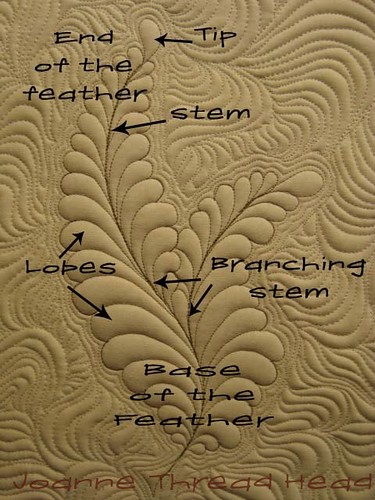
These are the terms I will be using to describe feathers.
Technique
There are many different ways to actually stitch out feathers, and hopefully you have tried a few techniques, and determined the technique that you prefer.
Last year, through the SewCalGal FMQ Challenge, we were shown a couple of techniques. I also show a couple of ways to quilt feathers on my blog (Traditional Feathers, and Bump-Bump Feathers).
Whether it is stitching a stem first, or stitching lobes off a drawn stem, stitching all the lobes from the base to the tip or stitching lobes up one side and down the other, backtracking or leaving a space between lobes..... Your technique for creating feathers is all part of your unique style for feathers.
Style
A quilted feather is made up of different elements, they all combine to make the style of the feather.
Stems
Since the stem is the first part of the feather that I stitch, I’ll talk about that first.
Generally feathers have gracefully curved stems, but that is all part of the style, you can have a fairly straight stem or a very curvy stem.
Also a feather can be made with a single stem, or it can branch, as many times as you want to fill up a space.
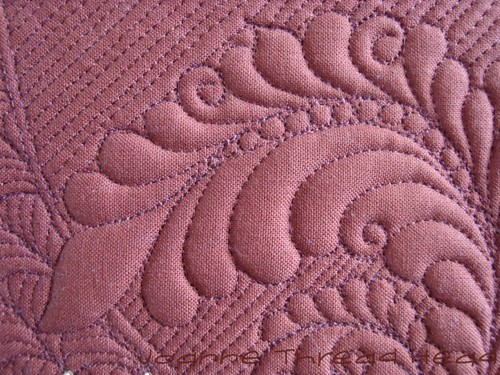
Stems can be a single stitched line,
or made up of two closely spaced lines.
A double stitched stem can be left plain (as the above picture) or the centre can be embellished (more on that later).
Tips
I normally stitch the tip of the feather when I am stitching the stem.
The tip can be can be a simple teardrop shape that will later blend in with the rest of the lobes -
or can be dramatically different -
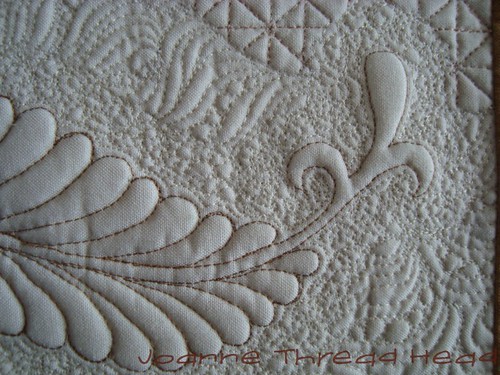
The tip can just be a larger tear drop, that will end up being a similar shape to the lobes-
or can be a different shape -
Lobes
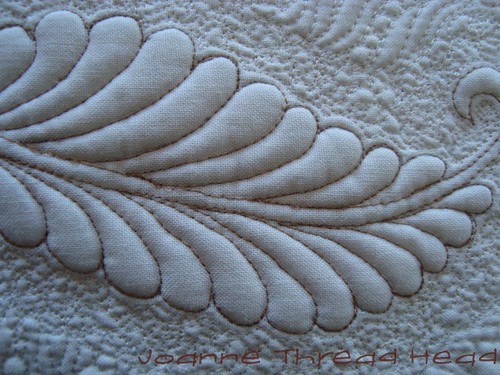
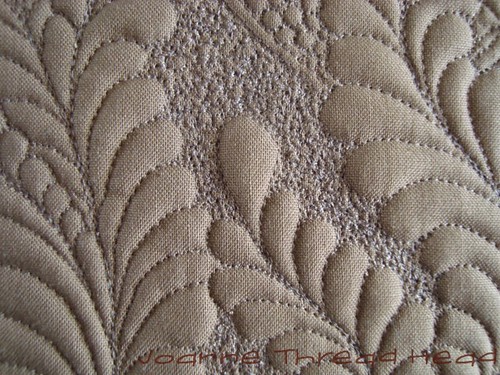
Lobes are generally tear drop shaped, coming off the stem at a very low angle. They can be very even (as shown in some of the above pictures) or they can be very uneven-
Or lobes can be different sizes on either side of the stem -
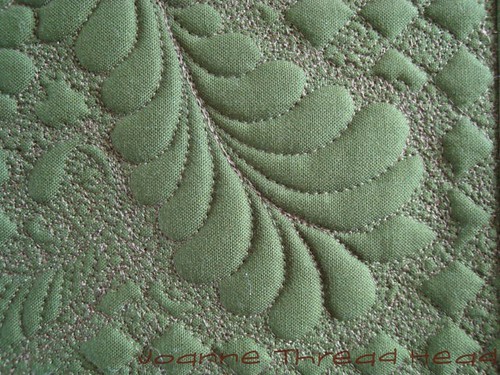
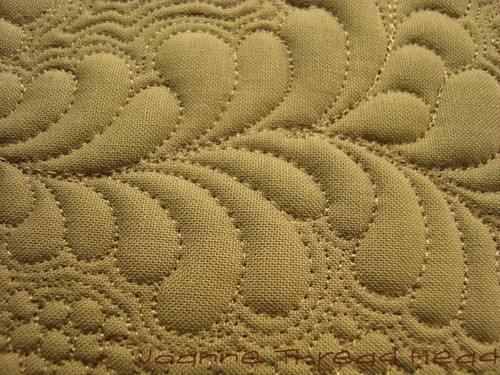
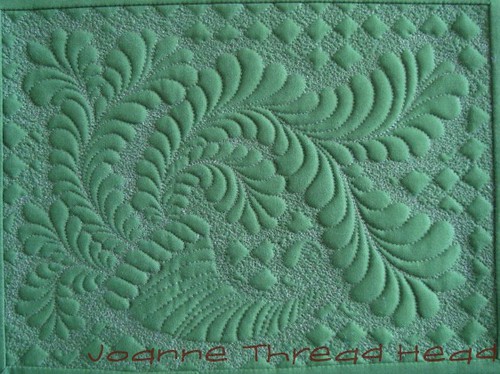
The space that the lobes fill adds to the style of the feather too. The ends of all the lobes can line up to create a nice smooth line (or curve) -
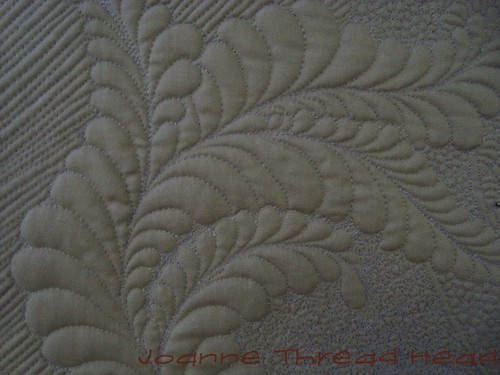
Lobes can also create shapes -
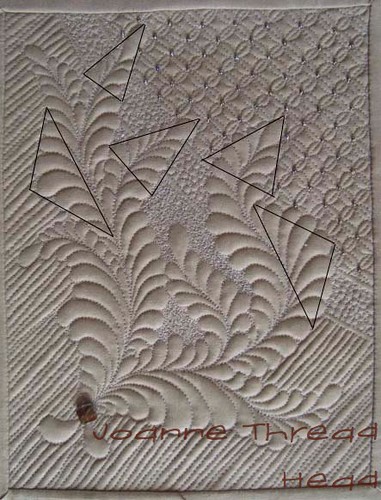
The above photo shows the lobes creating triangular shapes on the sides of the feathers. The ends of the feathers also taper, creating more triangle shapes.
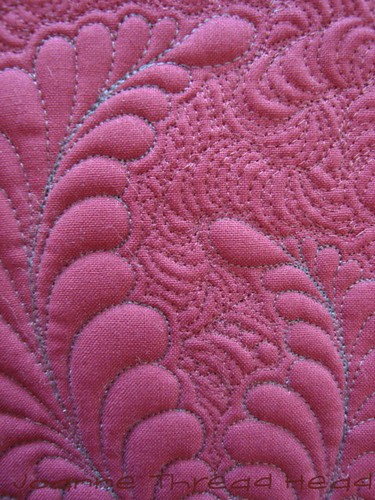
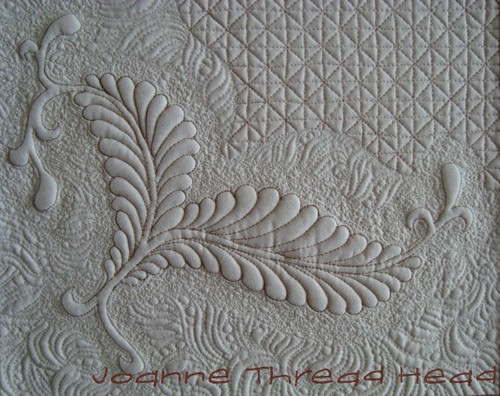
The lobes at the end of the feathers, in the above photo, create a round shapes.
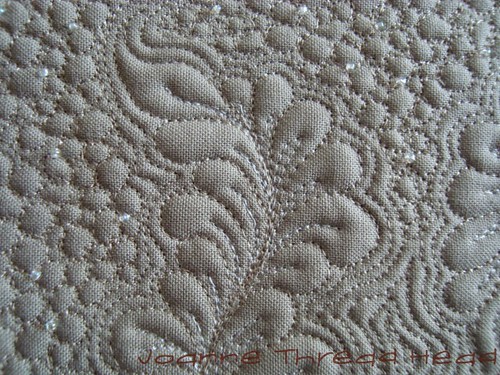
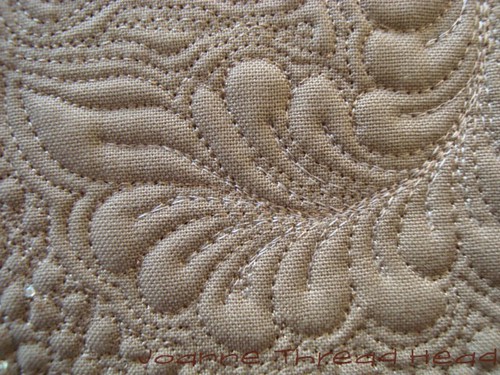
The lobes themselves don’t need to be just tear drop shaped.
The above photo shows lobes with swirls added, and one has a pointy end. There are many options for shapes of the individual lobes, even adding a few different shaped lobes, among regular tear drop ones, adds to the style.
Embellishments
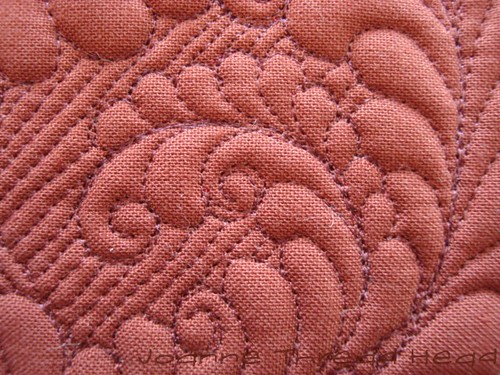
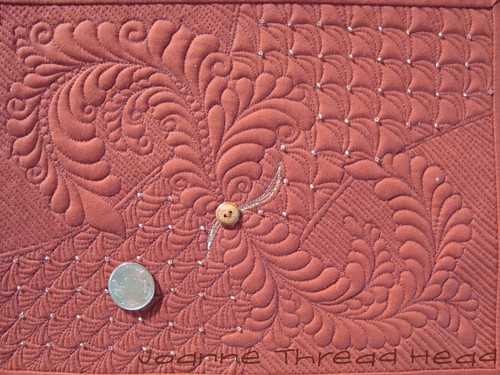
Embellished accents can be added to a feather while stitching it -
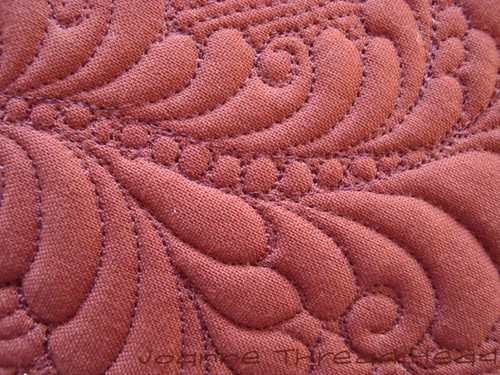
I stitch “pearls” in a double stem after stitching the first side of the lobes (when I FMQ feathers I stitch one side of a feather at a time, from the base to the tip). Instead of backtracking down the stem I FMQ circles all the way down the open stem.
Embellishments can also be added after the feather is all stitched -
For this one I added little lines in another colour of thread. These lobes are very small, but for bigger lobes more lines or swirls can be added.
Conclusion
These are just a few ways that feathers can be made unique. I hope that you will look at feathers in a new way. Look in books and online at free motion quilted feathers, and see what appeals to you. Look for different elements that you would like to recreate.
The possibilities are endless for feathers!
The Challenge
For this challenge I would like you to make up some quilt sample “sandwiches” -
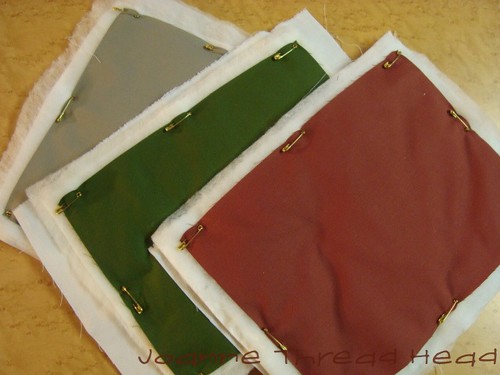
They don’t need to be too big, roughly the size of a sheet of paper. Three to five samples would be great, but at least two. Use plain fabric, it will show the quilting better, with batting that you normally use. Use good quality thread, I like 100Wt thread because it shows the backtracking less, but regular sewing thread is fine, in a colour that matches your fabric - you want to see the feathers, not the thread.
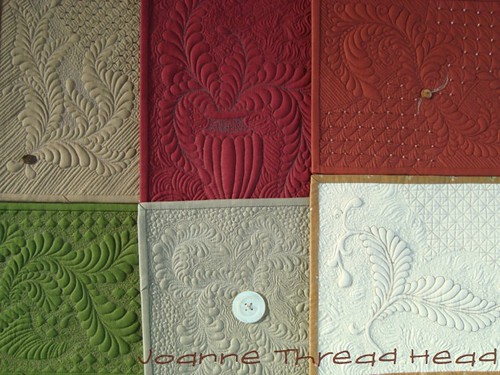
For the first sample, after looking at various different styles of feathers, choose elements that you like and quilt a feather. You can sketch out feathers before you start. After you quilt your feather, add some background filler(s) of your choice, to fill the sample, all in the same matching thread. This not only finishes your sample, but makes the feather look even better.
Now look at your sample. Look for elements that really worked for you, sometimes you will get a nice surprise, also look for elements that you don’t really like. Don’t be too critical of your work, don’t worry about stitch length etc., you are looking for elements of the design.
For your next sample(s), work with the elements from the previous sample(s) that you liked and expand on them. You can quilt more of the elements, or exaggerate them (this is what I like to do - I like the large tip on the end of a feather, what happens if I make it bigger...). Have fun and experiment.
I show the evolution of my samples on my blog Thread Head.
Tips for Free Motion Quilting the Samples
Usually when I teach free motion quilting, I encourage my students not to turn the piece so that they learn to quilt in every direction, but for these samples, turn your work. You are working on style, not technique for these samples, so get the best view you can (don’t spin the work around and around in one spot because this can cause the thread to break).
When working on small pieces the scale of the feather is quite small, the movement for quilting them will come from your fingertips.
I always mark the stem before quilting a feather -
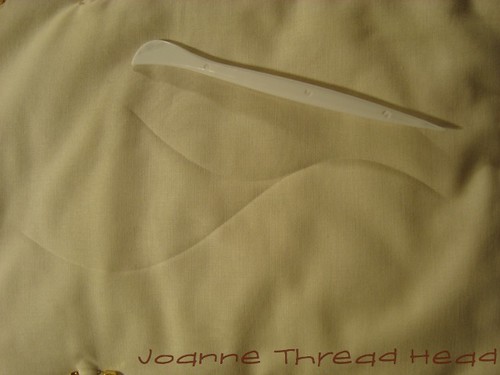
You can also mark the area you would like the lobes to fill too. These marks should just be guides, don’t stress about following lines.
I encourage you to finish your feather sample with background filler(s) because practice, practice, practice and even more practice is the only way to get better at free motion quilting, and every bit helps.
Add binding to your sample too (a single binding, cut 1+1/2” works well). These are works of art!
Thank you to Joanne of Thread Head for providing us such a wonderful FMQ tutorial.
Rules to enter this challenge:
Deadline to enter is October 31st, 2013. SewCalGal is coordinating working with sponsors and will announce prizes soon. But everyone is encouraged to participate in this challenge for the purpose of learning/improving your FMQ skills and not just to win prizes! Still, it is fun to have prizes in a challenge so SewCalGal is working with sponsors to get some prizes that are perfect for those interested in free-motion quilting!
Complete two or more samples from Joanne's tutorial.
For bloggers:
Please post your entry on your blog. To clarify, you can include as many photos of this tutorial exercise in your post, but you can only add one link to the linky tool below. You may also want to include insights in your post about your past FMQ experience and thoughts about this tutorial. Totally, optional, but you may also want to also let inspire others to learn/improve their FMQ skills and encourage them to participate in this challenge too, by including a link in your post back to this challenge.Bloggers should not add a link to their blog, but a direct link to their blog post that shares evidence that they applied the techniques from this tutorial to a project or practice sandwich.
For non-Bloggers:
1) You will need to have a Flickr account (www.flickr.com).
2) Upload your photos for this month's challenge to Flickr, batch organize, send your photos to groups, select "FMQ Challenge". While Flickr, limits the amount of text you can share in your description, feel free to share your perspective on this exercise and/or your past FMQ experience, if you wish.
3) After your photos have successfully been loaded to the "FMQ Challenge" group, click on your best photo in that group, ideally one that shows you created a project or sharing your practice sandwich that reflects insights shared in this tutorial. Be sure to Copy the URL link to your specific photo entry. Add that link to the linky tool above, to officially enter this show.
SewCalGal will be hosting 4-6 FMQ Challenges in 2013. The focus should be on learning/improving your skills, but there will also prizes. For more information on these challenges please check the main page for this event, which can be found on a tab labeled "FMQ Challenge" at the top of this page.
Have fun. And, I hope you'll pop over and follow Joanne at Thread Head too! SewCalGal is a happy follower.
And, I hope you'll talk with your local quilt shop and/or quilt guild event coordinator, to see about having Joanne come teach in your area. She also has a wonderful trunk show of beautiful quilts to share at such teaching venues that will certainly inspire many.

16 comments:
Great tutorial!! I look forward to playing with these ideas and producing some some samples (and developing my own signature) Thank you!
What a wonderful tutorial. Thank you so much for this - it is certainly a great learning tool. The work and photography for this are well done, and will be fun to follow. I will enjoy doing this project when I can. Thank you SewCalGal and Joanne.
This is a wonderful tutorial. I've been quilting feathers for years and this helped me look at them anew. I am going to re-analyze my feather quilting with fresh eyes. It is very helpful to see feathers discussed and analyzed like this, and it feels good to learn new things about something I've been doing a long time. Joanne is a great teacher.
Great ideas, I have a FALL top that I want to do feathers on, but waited to look for filler ideas or SOMETHING else, these are great!
Oh this is so much fun! I just had a quick look, have to come back and read again. Can't wait to try it out.
Wonderful post Joanne! Such great info. I learned to make my very first feather from the tutorial on your blog. I refer to it a lot.
The best post Joanne...now this really makes me want to practice, I can't do a FM feather on my own.
Julia ♥
This was a wonderful tutorial thank you so much...Hopefully it will fill in the areas that I am not sure about.
I love feathers and thank you so much for the tutorial. I am going to work on it this month. My problem is that I get one side to look great but the other comes out funky. Is is a right side left side mind thing? Any tips?
such a great tutorial - good luck for all those that take the challenge
This is such useful information, thanks so much....
Wow! She is so talented. These are gorgeous. Definitely something to aspire to.
Thank you Joanne for the great tutorial, I can't wait to start.
Thank you for the tutorial, nice to practice with the help of these information!
Thank you SewCalGal for continueing the FMQ challenges. Joanne your tutorial is great. I have been working on my feathers for this challenge for a while and come back and read the post and see something else to try. Thank you so much.
This challenge really helped me get a feel for the natural rhythm of the feather lobes. It has been most helpful. Thank you!
Post a Comment