
Quilted Postcards are truly a special gift to receive in the mail, or be given one in person. Many quilters make and swap, while some make to capture their memories and save their own creations.
When Janet McElroy (Jansmusingagain) offered to host a FMQ Postcard Swap for those participating in the 2012/2013 FMQ Challenge, it just seemed like a wonderful extension of our Challenge. And while there are all sorts of quilted postcards, this swap focused on capturing free-motion quilting on each card, giving all of us another way to use our practice pieces, as well as make special FMQ postcards. Thus, Janet and SewCalGal teamed up to create this FMQ Challenge to encourage everyone to make a FMQ Postcard.
Whether you make and swap quilted postcards, make them for gifts, or make them to keep, we want to encourage you to use your FMQ skills to make some quilted postcards. Participants in this challenge can count this to win prizes, which will soon be announced, for our 2013 FMQ Challenges, which all build on what we learned in FMQ tutorials released in the 2012 FMQ Challenge.
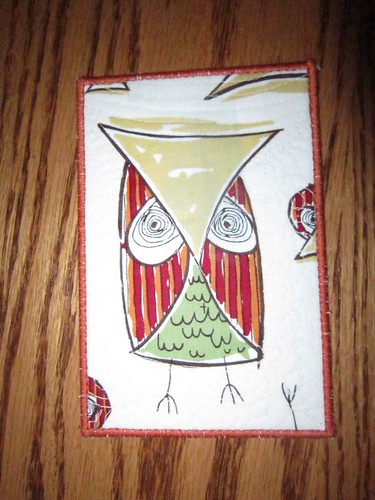
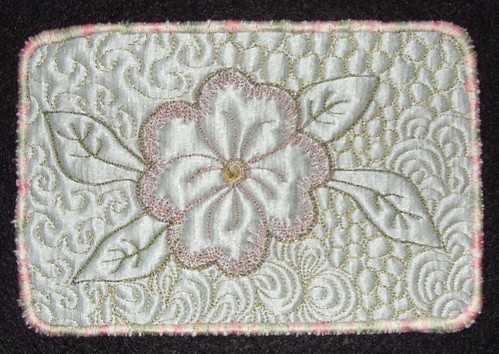
And, if you are not familiar with how to make a Quilted Postcard, this is also a great way to learn. Here are some inspirational photos of beautiful quilted postcards that have been made in shared in Janet's FMQ Postcard Swap:
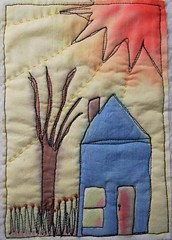
{above} made by Thea McCurry.
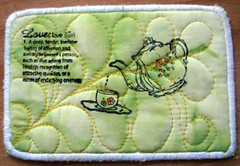
{above} made by Liz using FMQ and stamps.
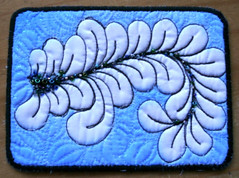
{above} made by Cathy.
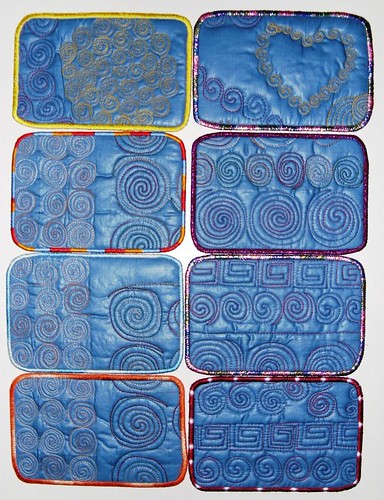
{above} quilted postcards made by Janet McElroy, using the sample piece from the 2012 November FMQ Challenge.
{above} postcard made by Alice.
{above} Carolyn's first FMQ postcard.
Tutorial to make quilted postcards
As mentioned earlier, Jan (Jansmusingagain) is hosting a free-motion quilted postcard swap for those that have been participating in the 2012/2013 FMQ Challenge. She has a great tutorial (part one and part two) that you can use to make your FMQ post cards. For those that have already been participating in this swap, you are ahead of everyone else for this particular challenge. But, there is still plenty of time for those that have not yet made any quilted postcards and want to join this challenge!
Here are a few additional tutorials on making quilted postcards that you may want to check out:
There are a number of ways to create a quilted postcard and you are welcome to participate in this challenge using any technique you prefer, but your postcard needs to show off your free-motion quilting skills!
Suggested Supplies:
- a free-motion quilting practice sandwich that has been quilted, with any FMQ design(s) that you want to use and you are willing to cut this piece into small quilts to make postcards, OR scraps of fabric that are about 5"x7" in size
- Backing fabric 1, ideally a muslin. This fabric will not be visible when your project is finished, so it really doesn't matter what the fabric looks like. It will be the backing of your quilted sandwich that becomes the top part of your "postcard sandwich".
- Backing Fabric 2, muslin or other solid or very subtle print. This fabric will be what is on the back side of your postcard that is visible, and what you will hand write and address your postcard on.
- scrap piece of batting about 5"x7"
- rulers, rotary cutter, mat
- A permanent marking pen, with a fine point, such as a Pigma pen (to be used to write on the back side of your quilted fabric postcard).
- thread
- Peltex, Timtex or another stiff interfacing that will give body to your finished postcard.
- optional: embellishments such as beads, crystals, decorative threads, yarn, applique', stamps and fabric ink. You could even use fabric paints, pens and pencils to color your quilted postcard.
- DO NOT use any paper, cardstock, or cardboard in making your quilted "fabric" postcard.
Suggested Assembly:
- Create your postcard sandwich with top fabric, batting and backing fabric #1. Do free-motion quilting, as desired. Be as creative as you wish. When finished quilting, trim down to 4"x6"
- Cut a piece of stiff interfacing and your backing #2 fabric - 4"x6
- Layer your postcard sandwich, which has been quilted, on top of your stiff interfacing and on top of your backing fabric #2. To secure you can layer using an adhesive spray such as 505, or lightly dab a few spots on each layer with a fabric gluestick.
- First stitch the edge with a very light zigzag stitch to secure, followed with a tight satin stitch. Or use any decorative stitch on your machine that you would prefer to use.
- On the back side of your postcard use a permanent marker to draw a line to separate the half of your postcard typically used for writing vs the address. Write and address your postcard, as appropriate.
Tips for Mailing:
- There are two main ways to mail fabric postcards: 1) Inside of an envelope, or 2) "naked" where the fabric postcard actually gets stamped at your local post office. Many prefer to collect "naked" postcards as they contain an actual postmark. If you mail your quilted postcard using the "naked" approach, be sure to take your postcard in to a clerk at your local post office and request them to hand stamp it. Some may charge a slightly higher rate for the hand stamping, but the treasured post card will surely be even more special to the recipient! If they can not do a hand stamp for postage, use an adhesive back post stamp not the type with glue that needs to get wet to apply it on a paper envelope, as it does not stay stuck on fabric!
- Do take time to write "POSTCARD" in the middle at the top of the back and draw a line down the midle just to separate the message from the address, just like a purchased postcard!
IF you want to join Janet's swap, please email Janet. Janet also has an optional group on Facebook, where participants in this swap can stay up to date with the swap, share photos, Q&A, etc.. You can find this group on Facebook by searching "FMQ POSTCARD FUN and CHALLENGES 2013" or click this link. Here is some insight Janet on this optional swap:
In the FMQ Postcard Swap 2013 we make and swap with our allotted partner one postcard per month, we have members in many different countries now. If after reading all the instructions and watching different blogs to see how the cards are made, you still wish to join the group, I would be happy to welcome you on board. I would need your address which I will never ever pass onto other folk only the swap partner. These postcards are loved by children by the way, they also in time wish to make one themselves, which I feel is a great neat and small way of introducing them to patchwork...just a thought. I will be happy to answer any queries from folk wishing to know any more about the postcards and group.If you do not want to join Janet's swap, but want to participate in this FMQ Postcard Challenge, that is fine too! You can send your quilted postcard to anyone whom you wish, or keep it for yourself. But it sure would be fun for the participants in the 2012/2013 FMQ Challenge to send/receive FMQ quilted postcards from someone that may have inspired you, helped you, or encouraged you during this challenge. After all, who wouldn't want to receive a beautiful quilted postcard with "your" beautiful free-motion quilting on it!
The Challenge
Look at the tutorials and decide if you want to cut up a practice sandwich or start with making a sandwich specifically for this challenge, to make quilted postcards. Select a design from any of the tutorial challenges released during the 2012/2013 Challenges, or another design. Yes, it is ok to use a stencil or do completely free-form FMQ. No right or wrong on this challenge, it is more that you use FMQ to create these quilted postcards and have fun doing it! Make as many as you want and share as many as you are willing to share. Think of them as quilted smiles that you give with others by way of a swap, or as you wish.
Thank you to Janet
for inspiring us to make free-motion
quilted postcards and
for hosting the optional
quilted postcard swap.
Rules to enter this challenge:
Deadline to enter is October 31st, 2013. SewCalGal is coordinating working with sponsors and will announce prizes soon. But everyone is encouraged to participate in this challenge for the purpose of learning/improving your FMQ skills and not just to win prizes! Still, it is fun to have prizes in a challenge so SewCalGal is working with sponsors to get some prizes that are perfect for those interested in free-motion quilting!
For bloggers:
Please post your entry on your blog. To clarify, you can include as many photos of this exercise in your post, but you can only add one link to the linky tool below. You may also want to include insights in your post about your past FMQ experience and thoughts about this tutorial. Totally, optional, but you may also want to also let inspire others to learn/improve their FMQ skills and encourage them to participate in this challenge too, by including a link in your post back to this challenge.Bloggers should not add a link to their blog, but a direct link to their blog post that shares evidence that they created quilted fabric postcards that incorporated free-motion quilting s definitely a requirement!
For non-Bloggers:
1) You will need to have a Flickr account (www.flickr.com).
2) Upload your photos for this month's challenge to Flickr, batch organize, send your photos to groups, select "FMQ Challenge". While Flickr, limits the amount of text you can share in your description, feel free to share your perspective on this exercise and/or your past FMQ experience, if you wish.
3) After your photos have successfully been loaded to the "FMQ Challenge" group, click on your best photo in that group, ideally one that shows you created a project or sharing your practice sandwich that reflects insights shared in this tutorial. Be sure to Copy the URL link to your specific photo entry. Add that link to the linky tool above, to officially enter this show.
Don't forget to periodically check the main page for this event as it will be updated to show links to the challenges, as they are released. And, it will soon be updated to recognize all the sponsors and show all the prizes. A special post will be created where participants can link up to show that they've completed 4 or more of the 2013 FMQ Challenges. All 2013 Challenges and the linky post (for winning prizes) will be released before May 31st.
SewCalGal will be hosting 5-6 FMQ Challenges in 2013. The focus should be on learning/improving your skills, but there will also prizes. For more information on these challenges please check the main page for this event, which can be found on a tab labeled "FMQ Challenge" at the top of this page.
Have fun. And, I hope you'll pop over and follow Janet at Jansmusingagain too! SewCalGal is a happy follower.

5 comments:
I am just learning how to FMQ, I've only done stippling so far, so I'm excited about this challenge!
This is an awesome idea....thank you so much for coordinating this, SewCalGal! Wonderful post with instructions and links. Hugs!
A wonderful idea to make quilted postcards for my grandchildren! We're going on a trip soon and I usually send them postcards from our various locations, so this would be a fun surprise for them.
What a great idea and thanks for including the tutorial!
I just made my fourth postcard and it is so much fun! I have a lot of ideas. Without this challenge I never had tried to make these postcards. The first card I ever send goes to Libby and the second to the swap. I hope Libby will be better soon.
Post a Comment