
I am thrilled to have Paula Reid as our September FMQ Expert, for the 2012 Free Motion Quilting Challenge and delighted to share insights with you today about this very talented woman.
Paula is the owner of "Batts in the Attic" quilting studio and has designed many patterns, including her stunning "Tequila Sunrise" quilt design. This quilt has a beautiful weave technique that gives great visual impact with this design, and the overall design really works well to show off beautiful free-motion quilting too! It was also featured on "Simply Quilts" in epsode #539.

Paula was also on two other episodes of Simply Quilts (#330 and #511).
Batts in the Attic features two DVDs with Paula:
"Borders & Bindings: Finishing Your Quilt"

"Fluff & Stuff: Machine Quilting with Paula Reid"

Beyond the Basics Free Motion & Trapunto with Paula Reid **** Coming Soon***

Paula also designed her famous "Batt Scooters" to help your hands hold the quilt, while doing free-motion quilting.

And, she also created "Batt Snipps" that are excellent when doing trapunto quilting, as well as general snipping of threads. You can watch a short video for more information on these snips too!

Paula is well known for doing beautiful free-motion quilting on large quilts, which are stitched on a domestic sewing machine. She travels the world teaching free-motion quilting and giving presentations at Quilt Guilds and Quilt Shops. While she has a variety workshops, her tutorial today shares insights on her technique called "Fluff & Stuff" which can help you quilt large quilts on a domestic machine.
SEPTEMBER TUTORIAL, BY PAULA REID:
When I first started making quilts in 1990, I pieced a bunch of tops and then wondered what to do with them. There weren’t any classes in my area on the subject and there certainly wasn’t a talented longarm quilter close by. In fact, I don’t think I knew what a longarm was at that point. So I proceeded to teach myself how to quilt my tops on my own machine. Later on, when I realized you could actually pay people to do this for you, I decided that I didn’t want to give up the creative control and would continue quilting them myself. Who knew that three years after making my first quilt, I would open a machine quilting business and be quilting 150 quilts a year by 1995?
Now it’s 2012 and having quilted over 1400 quilts on domestic machines in the last 22 years, ¾ of them queen or king size, I get a lot of questions about the basics of doing this. How do I hold the layers together? How do I work the quilt through the machine? What does your room setup look like that allows you to do this?
First of all, I do have one firm rule: Working large quilts through the machine all day is hard on the neck and shoulders. Since I quiIt for several hours every day, I work in 90 minute increments to minimize the fatigue and pain that can result from those long hours. After 90 minutes, I stop stitching and go do something else. It may be work related, like marking or pinning up another quilt, but I do get away from the machine for at least 15 minutes. On a work day (rather than a teaching day), I aim for four or five 90 minute sewing sessions.
I pin my layers together with safety pins; I’ve tried other methods and that’s the one that seems to work best for me. I’ve not been happy with the results of the sprays on large quilts, although I think a can of 505 can be your best friend if you are working on small pieces. Having said that, though, I know people who use spray to baste large quilts and find that it works well for them. That’s something I think we all need to try and then decide for ourselves.
To get the straightest stitches possible when machine quilting, I do two things: I put a straight stitch (0mm) throat plate on the machine and I use a sharp, strong needle. The straight stitch plate allows your thread less room to loop around, thus straightening out the stitch. As far as needles, it’s been my experience that a universal needle is too rounded to stitch perfectly straight; it merely finds the point of least resistance in your quilt and stitches there. I find that a denim/jeans needle (I use a Schmetz Denim/Jeans, size 80/12 almost all the time) will punch right through even needlepunched cotton batting so that my stitches are straight and even.
My room arrangement is also key to why I am able to get so much work done. A lot of the difficulty quilters experience with large quilts is controlling the weight of the fabric, batting and pins! If your quilt is constantly falling off of your work surface, you are expending a lot of energy repeatedly lifting it back up to the table. This can be exhausting!

After three years of struggling with this issue in my machine quilting business, I finally found a way to “trap” a quilt’s bulk on my table by putting my sewing cabinet in a corner so that the left side and back of the table are both touching the walls. As I feed the quilt through the machine, it stacks up against the walls rather than falling off. The weight is supported by the table and all I have to worry about is the part of the quilt that’s in my lap. My cabinet is made by Unique Sewing Furniture and is 65” wide by 48” deep. It’s nice to have this much space, but quilting can definitely be done on a smaller table. The largest quilt I ever quilted, 112” by 128”, was done using a table that just gave me 30” to the rear and 30” to the left of the machine needle. Having the table in the corner was the best decision I ever made as far as making quilting easier.
Another problem with quilting large quilts is that gravity always seems to be pulling the quilt down and making it harder to move. If you keep the quilt fluffed up as you feed it through your machine, you will not get the loss of control and the little bitty stitches caused when your quilt is “hung up” on your machine table or on a corner of the extension table (if you are not working on a flush surface).
My Fluff & Stuff technique can be a little hard to describe with words, so here is a video to show you how I do it:
{For non-English speakers, click here for a text transcription of this video. }.
You probably noticed that the video was taped in a studio, not my own sewing room! But no matter where we are, the principles are the same: Pull the quilt up from your lap, pile it on your chest and then sew down from there rather than trying to pull the quilt directly from your lap to the machine.
Try it – you just may find that your stitches are more even!
Time for some stitching!
My blog (Paula Reid Machine Quilter) has a close up of FMQ of my "Tequila Sunrise" quilt design, where I used a stencil from The Stencil Company, designed by Janie Donaldson and called "Fancy Feather".
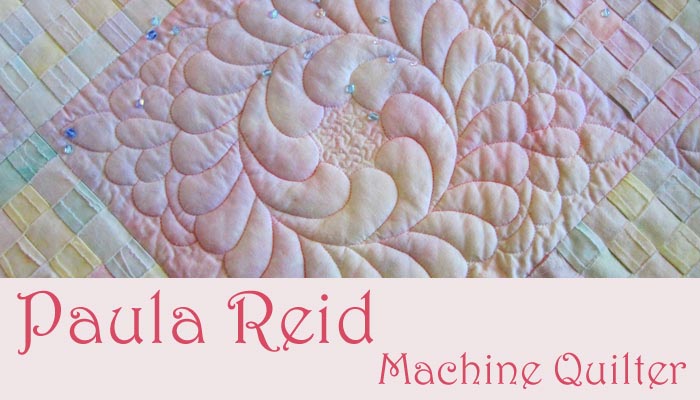
This design comes in both 11” and 13” sizes and has become my “go to” design when I want a beautiful feather effect for a large block.

The Stencil Company has approved use of this design to be shared with participants in the 2012 Free-Motion Quilting Challenge. You can click here to access a PDF which you can print or do a "save as" to your desktop, to print & use later. This file has adjusted the Fancy Feather design to fit in an 8" block.
While using a plastic stencil is much easier to mark your quilt, you can print out this design and use a variety of techniques to transfer it to your practice quilt sandwich. When I use Golden Threads paper, I trace the design, spray the back of the paper lightly with 505, press it lightly with my fingertips to the quilt top so that the 505 adheres and then stitch it and tear off the paper.
SewCalGal wants to also remind everyone that you can also use the technique shared in April Tutorial, by Don Linn. to transfer your design to your quilt.
This is not a continuous line design, so you will need to do some backtracking over your stitches. Start out stitching the circle, then the feathers on the inside of the wreath, followed with the feathers on the outside of the wreath, finishing with the decorative feathers in each corner.
Enjoy!
Paula
Thank you Paula for providing us with the above tutorial!
The Stencil Company is also offering a special discount to participants in this challenge. Between September lst and September 30th you can get a 20% discount, for in stock stencils. Use code = SewCalTwenty to be entered at the end of the order when the website asks for your coupon number.
SEPTEMBER CHALLENGE OVERVIEW
While this challenge is focused on learning and/or improving our free-motion quilting skills, you also have the opportunity to win prizes. To be eligible to win a monthly prize, simply complete the current months' tutorial in the month it is released and get your entry submitted via the linky tool, at the bottom of this page, no later than September 30th.
While this challenge is focused on learning and/or improving our free-motion quilting skills, you also have the opportunity to win prizes. To be eligible to win a monthly prize, simply complete the current months' tutorial in the month it is released and get your entry submitted via the linky tool, at the bottom of this page, no later than September 30th.
Paula has also donated ten copies of her DVD "Fluff & Stuff: Machine Quilting with Paula Reid", where ten lucky winners will also be randomly selected to receive their own copy of this DVD. {Thank you Paula}.
But do remember this challenge is more about learning and improving your FMQ skills, so don't rush thru the exercise just to enter. Take time to practice and embed this design to your muscle memory, before you enter. To clarify, DO NOT just add a link to your blog, but to your post that shows that you have completed this tutorial. You get one link, so keep practicing until you feel you are finished with this tutorial.
For bloggers:
For bloggers:
Please post your entry on your blog. To clarify, you can include as many photos of this tutorial exercise in your post, but you can only add one link to the linky tool below. You may also want to include insights in your post about your past FMQ experience and thoughts about this tutorial. Totally, optional, but you may also want to let everyone know that you have taken the Pledge and you did this exercise to enter the the challenge this month, where randomly selected winners will win a prize. You may inspire others to want to join this challenge too!
For non-Bloggers:
1) You will need to have a Flickr account (www.flickr.com).Remember only one link (entry) per person that has taken the pledge to learn and/or improve their Free Motion Quilting Skills, on a home sewing machine, in 2012.
2) Upload your photos for this month's challenge to Flickr, batch organize, send your photos to groups, select "2012 FMQ Challenge". While Flickr, limits the amount of text you can share in your description, feel free to share your perspective on this exercise and/or your past FMQ experience, if you wish.
3) After your photos have successfully been loaded to the "2012 FMQ Challenge" group, click on your best photo in that group, ideally one that shows the stencil and how you quilted using that stencil. Copy the URL link to your particular photo entry. Add that link to the linky tool above, to officially enter this show.
For those that may need help to link up the link to their tutorial project, to the linky for this challenge, Dana (Stormy Days) has also written an excellent tutorial for using linkies, so please take time to read her tutorial if you are not familiar with linkys or have any questions about linkys, in general. Please read the rules above, before you enter by way of adding a link below. And, Only add one link after you have practiced the tutorial to master the design. No rush, you have all month to practice and enter. Please follow the rules on this tutorial post, before you add a link.
Participants of SewCalGal's 2012 FMQ Challenge can link here, during September, to enter to win a monthly prize bundle!
To officially be entered in the 2012 FMQ Challenge please take time to fill out the Pledge Form" . Unfortunately, I couldn't figure out an easy way to get the email addresses collected in the Pledge Form to automatically load to my MailChimp mailing list, as originally planned. While I apologies, I do ask, if you want to receive email reminders when new FMQ tutorials are released each month, please also sign up via the special mailing list for this activity. And, don't forget that the page labeled "2012 Free-Motion Quilting Challenge" is the main page for the FMQ challenge and will be updated throughout the year, to provide a summary of current info and appropriate links. There are two "optional" groups that you may also want to join to network with others participating in this challenge:
If you have not yet completed the previous tutorials, here are the links:
"Bonus" tutorials will be released, this summer, that will also be options for those needing to complete 12 FMQ tutorials anytime in 2012 to be eligible to enter to win a Grand Prize.
Those on Facebook, may also want to join the 2012 Free Motion Quilting group.
There is also a free forum hosted by AQS that has been setup for participants in this challenge. Simply visitMy Quilt Place, create an account or log in, click on groups and join the group "Free Motion Quilting on a Domestic Sewing Machine".
- The January tutorial, by Frances Moore,
- The February tutorial, by Diane Gaudynski ,
- The March tutorial, by Ann Fahl was only available during the month of March. To clarify, this tutorial will be removed shortly, in keeping with the condition by this FMQ Expert.
- The April tutorial, by Don Linn
- The May tutorial, by Leah Day
- The June tutorial, by Cindy Needham
- The July tutorial, by Angela Walters
- The August tutorial, by Wendy Sheppard
"Bonus" tutorials will be released, this summer, that will also be options for those needing to complete 12 FMQ tutorials anytime in 2012 to be eligible to enter to win a Grand Prize.
- Bonus Tutorial #1, by Linda Moran.
- Bonus Tutorial #2, by Susuan Brubaker Knapp
- Bonus Tutorial #3, by Diane Loomis ( to be released Late Sept/October).
And, don't forget you can find Paula at:
Be sure to check out her online schedule, to see if she is teaching a workshop in your area. You can also speak with your local Quilt Guild Program Chairperson and your local quilt shops to have them schedule a workshop with Paula in your area. Paula loves to travel and teach workshops, as well as give presentations. She has a variety of topics too, which inspire many quilt guilds and shop to have her come on a regular basis. Check out her workshop & lecture description page, for a complete list.

15 comments:
Great tips!!!
I also appreciate getting the technical details from the instructors, such as seeing Paula's sewing table and advice on manipulating the quilt. I'm definitely going to use the size 12 needle and fix the throatplate so that I have the "0" effect. I just got Don Linn's book yesterday and he mentions the same thing, so it must make a difference. The throatplate advice is just something I wouldn't think of myself. Thanks.
whoot whoot off we go again...another exciting challenge...
Thank you for the great tutorial, Paula! I especially like the tip about getting the straightest stitch. I will give that a try when I work on this tutorial. The suggestion about having the table in the corner so that the left and back sides are blocked from allowing the quilt bulk to fall off the edges is a good one too.
I love the video with tips on how to "fluff and stuff" the quilt through. So nice to get advice on the other things that go into quilting a quilt.
yeahhh, beautiful feathers, love it ☺
THANKS!!!!
Liebe Grüße
Bente
Wonderful tutorial. And Paula's work is spectacular.
I own Paula's "Fluff and Stuff" DVD. It is excellent. Every time I watch, I pick up something new I missed during a previous viewing. I highly recommend it!
Thanks to Paula for such a great set of practical hints and proof, once again, that FMQ/machine quilting can be done on a DSM at a high level of quality! She, Leah Day, Wendy Sheppard and others have been my inspiration in my quilting adventure!
Thanks for all the awesome featured quilters!!!!!
that fluff and stuff might be the help I need. I am off to try my quilting today.
I've done my final sample block and linked to my blog. Thanks Paula, for a great tutorial. The Fluff & Stuff video was great!
task is very hard to me.
Great tutorial from Paula and a great challenge this month!
Gracias a Paula por el estupendo tutorial de este mes y a SewCalGal por la organización. Poco a poco vamos aprendiendo cada vez más sobre acolchado libre y mucho más.
Post a Comment