I am happy to have Angela Walters, as our July FMQ Expert, for the 2012 Free Motion Quilting challenge.
Angela lives in Liberty, Missouri, with her husband and 3 really cute kids. She shared that she "loves, loves, loves coffee and probably couldn't run my business without it. :) In my freetime (what little there is) I like to read books and waste time on the internet. :) ".
She travels to teach at shows and quilt guilds, all over the world, and also hosts quilting retreats and extended teaching workshops for quilters on both longarm and domestic sewing machines.
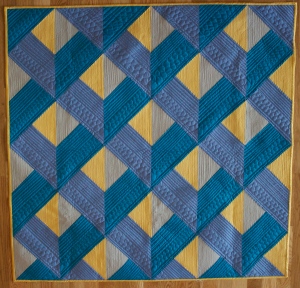
{above} Quilt designed for Modern Quilts Unlimited magazine, by Angela. You can find the free pattern on their website!
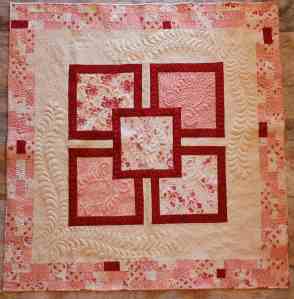
{above} "Cabbages and Roses", designed and quilted by Angela, is also a free quilt pattern featured on the Moda Bake Shop.
This amazing woman is already working on another new book "In The Studio with Angela Walters" that should be released this coming December, also with CT Publishing.
This coming October, Angela will be teaching at the Machine Quilters Expo (MQX) in Portland, Oregon. Classses are very reasonably priced and space is available in her classes for the following topics:
- Techniques for Quilting Negative Space (Domestic)
- Tips and Methods for Quilting Efficient
- Blogging for Business
- Machine Quilting for the Modern Quilt
- Beyond Customer Quilts
And, in January 2013, Angela will be teaching at Road to California. Dates and insights on classes will be announced mid-July. For information on where Angela will be teaching, signing books, presenting Trunk Shows, etc. check out the events page on her blog.
If you are interested in having Angela come to your area, be sure to speak with your Quilt Guild Events Coordinator and/or local Quilt Shop owner.
You can find Angela at:
Blog: Quilting is my Therapy
Facebook: Machine Quilting by Angela
Twitter: Angela Walters
HI!! My name is Angela Walters and I am so thrilled to join you
for this months tutorial.
First, let me tell you a little about myself! I learned how to
quilt from my husband’s grandfather almost 10 years ago. He patiently taught me
how to make my first quilt and my obsession began! One day, he suggested that I
buy a quilting machine, and of course I agreed!
I started quilting for local customers, and found that I really, really loved machine quilting! I happily continued quilting traditional quilts over the next several years, then everything changed. About 2 years ago, I was invited to the first meeting of the Kansas City Modern Quilt Guild. I had never seen a “modern” quilt and wasn’t even aware that a modern quilting movement was underway.
After quilting for a few modern quilters and I realized that machine quilting modern quilts required a slightly different approach. The last couple of years have been amazing. I have been lecturing, teaching and writing. My first book, Free-motion Quilting with Angela Walters has just been released and my second book, In the Studio with Angela Walters will be out this November.
My grandpa encouraged me when I was first learning how to machine
quilt, and I want to do the same for other quilters!
Enough about me, let’s talk about this month’s tutorial. I am
going to show you how to quilt a design that I call Tiles.
This versatile design can be used in a number of different ways.
Try using it in the border of a quilt, in a large area of negative space, or
even in the background of a quilt. But be careful, it’s a little tricky to fit
in smaller areas! The most important thing is to relax and have fun!
But before I start, a quick note. Even though I have a Longarm
quilting machine, I also have a Janome sewing machine that I like to quilt
smaller projects on. Most, if not all, of the designs that I show can be done
on both machines and the Tiles quilting design is no different! For this
tutorial, I used my longarm, but don’t let that distract you! Just follow the steps
and soon you will be quilting Tiles too!
note:
Even though I usually use matching thread, I used a bright red
thread so that the quilting shows up.
Start from the edge of the quilting area. Any part of the edge
will work, although I try to avoid starting at a corner.
Quilt two sides of a box. Make sure that you touch the edge of
the quilting area.
From that point, fill in the box with the design of your
preference. You could use any meander design. For this illustration, I used a
swirl design.
Fill in the box completely ending at the opposite point (your
original starting point).
Echo the outside of the box. First, travel up the side of the
quilting area approximately 1/2”. Then echo the sides of the box that you
quilted in the earlier steps.
Congrats! You have just finished a Tile. Now it’s time to fill in
the whole quilting area.
To quilt the next tile travel a couple of inches up the line you
just quilted.
From that point, quilt two sides of another box.
Just as you did with the first Tile, fill in the box completely
ending at the opposite point.
Echo the sides of this box by first traveling up the previously
quilted line about 1/2’’.
Then echo the sides of the box.
Repeat the above steps to quilt the third tile. First echo up the
line you just quilted a couple of inches.
Quilt the sides of another box. For this illustration, I first
quilted out to the left, several inches up, to the right and then down until I
touched the edge of another Tile.
Note: When quilting this design, you always want the edges of the
tile to touch something. It doesn’t matter if it’s the edge of another Tile or
the edge of the quilting area, the most important thing is that it touches.
This is what gives it the “illusion” that the Tiles are laying on top of each
other.
Fill in the box just as you did in the steps earlier, ending on
the original stopping point.
Echo the sides of the box.
Sometimes you will end up with smaller spaces in between Tiles.
No need to worry, just fill in those smaller spaces with the same
filler design until you can work yourself to a another spot to start the next
Tile.
Quilt the sides of the next tile and continue filling in the
quilting area.
When you find yourself close to edge of the quilting area just
fill in those smaller areas with the same filler design.
If you want, you can quilt a few lines. This adds to illusion
that the tiles laying underneath each other.
Fill in the area completely.
Stand back and admire your handiwork!
Instead of quilting the individual tiles in box shapes, you can
make the sides irregular and jagged.
The result is a more jagged, irregular look. The most important thing about this design is that you don’t stress out about it too much. Just relax and enjoy the process.>
Happy Quilting - Angela.
Thank you Angela for providing us with the above tutorial!
JULY CHALLENGE OVERVIEW
While this challenge is focused on learning and/or improving our free-motion quilting skills, you also have the opportunity to win prizes. To be eligible to win a monthly prize, simply complete the current months' tutorial in the month it is released and get your entry submitted via the linky tool, at the bottom of this page, no later than July 31st. But do remember this challenge is more about learning and improving your FMQ skills, so don't rush thru the exercise just to enter. Take time to practice and embed this design to your muscle memory, before you enter.
For bloggers:
Please post your entry on your blog. To clarify, you can include as many photos of this tutorial exercise in your post, but you can only add one link to the linky tool below. You may also want to include insights in your post about your past FMQ experience and thoughts about this tutorial. Totally, optional, but you may also want to let everyone know that you have taken the Pledge and you did this exercise to enter the the challenge this month, where randomly selected winners will win a prize. You may inspire others to want to join this challenge too!
For non-Bloggers:
1) You will need to have a Flickr account (www.flickr.com).There will be three lucky winners that will be randomly selected and announced on the main page for this event the middle of August.
2) Upload your photos for this month's challenge to Flickr, batch organize, send your photos to groups, select "2012 FMQ Challenge". While Flickr, limits the amount of text you can share in your description, feel free to share your perspective on this exercise and/or your past FMQ experience, if you wish.
3) After your photos have successfully been loaded to the "2012 FMQ Challenge" group, click on your best photo in that group, ideally one that shows the stencil and how you quilted using that stencil. Copy the URL link to your particular photo entry. Add that link to the linky tool above, to officially enter this show.
note: While there was a unique group for each monthlychallenge, based on feedback the generic 2012 FMQ Challenge group was been created that will hold all your photos for the remaining monthly challenges, so you will not need to rejoin a group on Flickr every month.
A monthly prize bundle will be provided with items donated by Aurifil, SewSlip, Sewline, and Quilters Touch. Remember only one link (entry) per person that has taken the pledge to learn and/or improve their Free Motion Quilting Skills, on a home sewing machine, in 2012.
And, Angela is also generously giving two
lucky winners a copy of her new book "Free Motion Quilting with Angela Walters". This book is also available for purchase at CT Publishing's online store, or you can order a signed copy of this book at Angela's site.
For those that may need help to link up the link to their tutorial project, to the linky for this challenge, Dana (Stormy Days) has also written an excellent tutorial for using linkies, so please take time to read her tutorial if you are not familiar with linkys or have any questions about linkys, in general. Please read the rules above, before you enter by way of adding a link below. And, Only add one link after you have practiced the tutorial to master the design. No rush, you have all month to practice & enter. Please follow the rules on the tutorial post, before you add a link.
To officially be entered in the 2012 FMQ Challenge please take time to fill out the Pledge Form" . Unfortunately, I couldn't figure out an easy way to get the email addresses collected in the Pledge Form to automatically load to my MailChimp mailing list, as originally planned. While I apologies, I do ask, if you want to receive email reminders when new FMQ tutorials are released each month, please also sign up via the special mailing list for this activity. And, don't forget that the page labeled
To officially be entered in the 2012 FMQ Challenge please take time to fill out the Pledge Form" . Unfortunately, I couldn't figure out an easy way to get the email addresses collected in the Pledge Form to automatically load to my MailChimp mailing list, as originally planned. While I apologies, I do ask, if you want to receive email reminders when new FMQ tutorials are released each month, please also sign up via the special mailing list for this activity. And, don't forget that the page labeled
Those on Facebook, may also want to join the 2012 Free Motion Quilting group.
There is also a free forum hosted by AQS that has been setup for participants in this challenge. Simply visit My Quilt Place, create an account or log in, click on groups and join the group "Free Motion Quilting on a Domestic Sewing Machine".
- The January tutorial, by Frances Moore,
- The February tutorial, by Diane Gaudynski ,
- The March tutorial, by Ann Fahl was only available during the month of March. To clarify, this tutorial will be removed shortly, in keeping with the condition by this FMQ Expert.
- The April tutorial, by Don Linn
- The May tutorial, by Leah Day
- The June tutorial, by Cindy Needham
- "Bonus" tutorials will be released, this summer, that will also be options for those needing to complete 12 FMQ tutorials anytime in 2012 to be eligible to enter to win a Grand Prize. The first released bonus tutorial was provided by Linda Moran.
Copyright Reminder: This site is copyright protected. You are certainly authorized to print and use this tutorial for your own use. Please DO NOT print and share any part of this tutorial post, nor share electronically, without written permission from Angela Walters and SewCalGal.


19 comments:
I love the look of this one especially the irregular one and I like the filling in smaller spaces, it makes it easy on a regular machine. Thanks.
So excited to see this tutorial by Angela! It was awesome!
What a great tutorial and this definitely looks like a fun design! Thanks!
Another fabulous journey to begin, this looks like a fun tutorial!! Cannot wait to begin!!! Thanks Angela and SewCalGal!!
Thank you to Angela for some great ideas to try and to Darlene for hosting these fun online lessons!
Wonderful tutorial! Can't wait to try it.
Another fun, challenging challenge! I love the look of Angela's tiles. Thanks!!
wow! that is really cool. can't wait to try this one.
I haven't had time to try any of the months, but I do think I am going to start playing catch-up, working my way backwards starting with this one!! Thank you!
Oh wow Angela!! This looks like a great tutorial...I am anxious to get started....I want to take this time to thank Darlene and Angela for doing all this work for us...it is much appreciated....I will do my best with it.
just what i needed to quilt my modern quilt...looks like so much fun
I really enjoyed the tutorial by Angela. I think I should be able to try this on my long arm. I am new to quilting on a long arm so am trying to improve my designs. Does Angela use a ruler to get those beautifully straight echo lines? Thanks for sharing this.
Kathy- Since the lines are fairly short you don't need a ruler (although you can definitely use one if it makes you more comfortable!)
Good Luck!
Angela
Thanks so much for this lesson. I love the tile effect....to me it has an "old world" look.
Thanks so much, Angela! This was fun. I'm using my version of quilt tiles on a block keeper. This method really looks nice on a large piece of fabric.
As I stated on my blog, I can't seem to get a straight line free motioning. I even tried a ruler. So I cheated a bit and drew in my tile lines. I know, keep on practicing! LOL
Sue~ That's not cheating! You have to make it work for you! :)
interesting task. I really enjoyed it.
This is my favorite motif so far - thanks, Angela! I recognized it in Tula Pink's book -- looks terrific on these modern big-patch beauties!
Fun quilting project!! I love seeing all the different uses for this design!! Thanks Angela!!!
Post a Comment