
I'm holding off sharing a photo of the quilt made with tutorial(s) I'm sharing today, at least till tomorrow. Today's tutorial will offer something for a variety of quilting interests, and the design is very forgiving and very flexible. While, I'm sharing this tutorial for a baby quilt, it would easily work as a table runner, table topper, wallhanging, or even a large quilt. It is a fun design that works well to show off focal fabrics, photos on fabrics, applique blocks, machine embroidery designs, etc.
I'll provide a variety of formats to make this quilt using traditional cutting methods, or with an AccuQuilt GO!. And, for those that are EQ7 Users I'm also providing a simple tutorial so that you can take this design into EQ7
First, I've learned to prefer to look at a quilt design without any predefined colors. For those that do use Electric Quilt software, you may also enjoy the ease of being able to take a basic quilt design and play with colors, to decide how you want to make a quilt. Others, may sketch the design on paper and use colored pencils.

What would you want to put in the main blocks?

As mentioned earlier, you can easily adapt this quilt to just about any size you wish. It works well for table runners, wall hangings and large quilts. Insights I'm sharing with you today will create a 36"x36" baby quilt or wallhanging.
Fabric Requirements for baby quilt top:
- center squares: 3/8 yard
- 24 - diamonds: 3/8 yard
- Remaining sashing & borders: 1 yard
Tutorial for EQ7 Users
EQ7 makes it very easy to adapt this design to a variety of sizes. You may be a proficient EQ7 user and not need this simple tool, but as I periodically hear from new EQ7 users that want more tips & tutorials, I'm including these simple instructions so that you can also use this quilt design to learn more about EQ7.
Before I begin, I want to share that the Electric Quilt Company has many wonderful online lessons that are free. This lesson was leveraged from insights on their lessons, as I've learned so much about EQ from their free lessons, and their great reference books too. I also love their Quilting Design software packages, which are currently on sale. The main 6" block in this quilt design would also look great in a solid fabric, or soft design, that could show off some beautiful free-motion quilting using one or more of EQ's Quilting design software packages too!
BASIC STARTING INSTRUCTIONS
- Open EQ7.
- Name a new project: Sweet Lullaby Quilt
- Click OK.
- Click WORKTABLE > Work on Quilt.
- Click QUILT > New Quilt > Horizontal.
- Click the Layout tab (at the bottom of your screen).
- Make the sizes here look like this:Number of blocks:3 Horicontal3 VerticalFinished size of blocksWidth 6.00Height 6.00
- Click Add to Sketchbook

6. Click on the Layout tab (at the bottom of your screen.
7. In the Layout window check the box to select "include sashing" and set the width and height = 3".

9. In the Borders window select your border style of Mitred and set the left, top, right and bottom borders to 3.00.

11. Click on Block button

12. click on Add to Sketchbook.
13. Click on the line drawing tool
14. Set the measurements for this block for a width = 3" and height = 6". Draw four lines to create the diamond in the center of this 3x6 block.
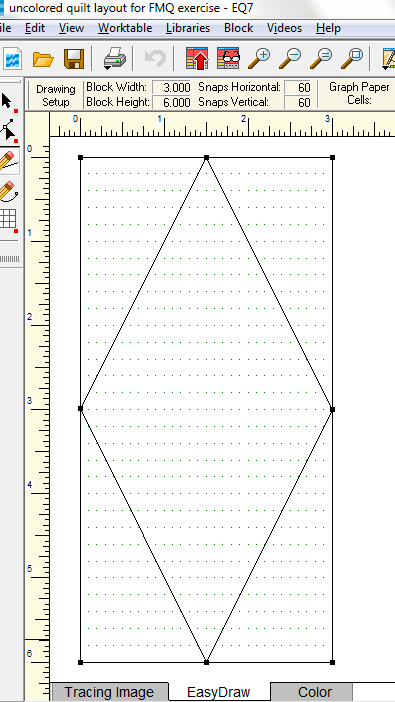
15. click on Add to Sketchbook.
16. Click on "work on Quilt " icon

17. Click on "Layer 1" tab
18. Click on "set Block button" and use your mouse to paint the blocks in your quilt layout for which ones should be solid blocks vs HST.
19. Click on the Diamond in the Sketchbook Blocks window.
21. In the window for the Sketchbook Fabrics and Colors you can click on the tab for fabrics or colors and use the scroll bar, at the bottom of this window, to view more choices. Select fabric choices or colors to paint your quilt top, as you like.
23. Click the save button.
Congratulations. You have now created the Sweet Lullaby Quilt in EQ7.
To print Fabric Requirements, Click File, Print, Fabric Yardage and Print.
Sweet Lullaby Quilt - Traditional cutting Tutorial:
Wallhanging:
Cut 9 6.5" squares by cutting 2 strips of fabric that are 6.5" the width of your fabric and subcut into 6.5" squares to create 9-6.5" squares.
Cut 4 3.5" strips of fabric for your borders.
For the Diamond Sashing there are several different techniques to create the diamonds. I have two favorites that I'll share with you, and you can decide which you prefer to use.
Option 1) Paper piecing requires you to create a template that measures 3.5"x6.5" and has the a 1/4" frame drawn. Within that frame, draw the diamond motif drawn in the center. Follow traditional paper piecing techniques (too detailed to include in this tutorial) to create this diamond.
Option 2) Use the Quilt in a Day Triangle in a Square ruler to create 2-3.5" half diamonds and sew them together to create a complete diamond block that measures 3.5"x6.5", using their instructions to make the triangle in a square.
Cut 1 - 3.5" strip for the center squares of your 8 point diamonds and subcut to create 16-3.5" squares.First, sew all of your diamonds in a square. Then sew two diamonds in a square together to create your diamond blocks.
Sew your rows together with your primary blocks and diamond sashing.
Sew your rows together of your sashing.
Sew your rows together.
Add your borders.
AccuQuilt Tutorial for Seet Lullaby Quilt:
Cut 24 sets of 3" finished Triangles in a square with die #55027
use the same color for your border fabric for the outer part of the triangle. Note: I would pre-cut a strip that measured 3 1/4" or3 1/2" and place on this die blades to cut the shapes.

use the fabric for the center of your diamonds for the triangle on this die.
Cut 16 3.5" squares with the GO! Square die # 55006 with the fabric you want to use in the center of your 8 point stars. I would pre-cut a strip that measures 3 1/4" or 3 1/2" to use to cut with this die. As I don't have this die, I manually cut this size square with my rotary and ruler.
You can also use a strip die and doe a cross cut, to create this square.
Cut 4- 3.5" strips, width of fabric, with your GO! Strip Cutter 3 1/2" die #55032 using the fabric you have selected for your border. As I don't have this die, I manual cut these strips with my rotary and ruler.
Congratulations, you've finished making your Sweet Lullaby Quilt top using your AccuQuilt GO!
If you have any questions or feedback on this tutorial, please email me. I will update this tutorial to make it easier to follow, based on your feedback.
4 comments:
What a wonderful tutorial, love this quilt....and maybe an EQ7 would be nice?
I want to try this.
Oh my goodness, that is beautiful. Can't wait to see the finished product, especially the FMQ.
It's Beautiful. What stitch did you use to applique?
Post a Comment