

My apologies as this is a fairly lengthy tutorial, but one that I hope will help newbies that want to join shows and challenges on SewCalGal that use a "linky". Steps are provided in this tutorial for bloggers and non-bloggers, so please skim thru to read the sections that apply to you.
SewCalGal periodically hosts events that allow bloggers and non-bloggers to "link up" via a linky tool. Bloggers are encouraged to post on their blogs, which allows much more flexibility and detail when it comes to sharing information thru a linky supported event.
For non-bloggers, there are a variety of photo hosting sites that allow you to upload photos and add text, where you can get a URL to your photo entry to add to a linky party. But, SewCalGal has come to appreciate the benefits of non-bloggers using FLICKR for uploading and sharing photos in linky parties hosted by SewCalGal. Thus, going forward a requirement for non-bloggers to enter virtual shows and various challenges hosted by SewCalGal will be to have a Flickr account, be able to upload your photos to Flickr, share in a common group for the challenge and be able to add a direct link to one of your photo entries into the linky for the specific challenge.
To clarify, bloggers have the ability to share an number of photos in a single post that they can easily add to a linky. Non-bloggers can upload as many photos to the Flickr groups, to share as they wish, but only one link can be added to the linky. Thus, non-bloggers may want to consider adding all the photos they wish but either picking one single photo that represents their favorite, or taking a consolidating all their photos to a collage or taking a picture of all of their projects together and uploading one more photo to ultimate share the link in the linky.
This post is going to be treated as a living document on SewCalGal, where I plan to update it periodically to reflect current challenges. For now it is written with the mindset of those entering challenges in
A Year of Red and White Quilt Challenges
and/or
A Make It Handmade Christmas Challenge.
Insights are shared in this post on how you can use a LINKY tool, as well as how non-bloggers can use a FLICKR account to upload a picture to a free account to enter events where linky tools are used on SewCalGal and such events are open to non-bloggers.
I could use help with feedback on these instructions, to help make them easier to use. So, if you are willing to provide feedback on anything that you think can be changed to make it such, please email SewCalGal  .
.
HOW TO USE THE LINKY TOOL
First, I want to recognize Dana (Stormy Days) for writing a tutorial for the 2012 Free-Motion Quilting Challenge and approving me to use it on my blog, in a generic format currently modified for use for the Year of Red/White Quilt Challenges and/or the Make It A Handmade Christmas Challenge. Click here to read Dana's original tutorial.
There are several types of LINKY tools. This tutorial is written for the type of linky that allows you to add a URL to your specific blog post (not a generic link to your blog), as well as to upload a single photo to the LINKY.
Step One for Bloggers
After you've written your blog post you will need to get the web address for that specific post. To do this, first get out of your blog editing software and view your blog as if you were a user. Not the browser menu will show a URL that is generic for your blog address.
Click once on your blog post header and the URL will change, showing a detail url to that specific blog post. It is this URL that you will want to add to a linky.
These instructions are written to help a blogger identify how to capture a URL to a direct post vs a blog. Sadly, some bloggers will add generic links to linkys that take people to their blog, but not their specific blog post. Over time as more posts are added, it is too much work to scroll down to find their specific post that they intended to share in the respective challenge. To avoid this problem it is critical for bloggers to know how to capture a url for a specific post vs just their blog URL.
Steps are provided here to help bloggers understand how to capture a url/link to a specific post on their blog.
Be sure you are not in the editing mode for your blog, but as a reader. Typically the browser menu will show your generic website URL. Click on the title of your blog post and your URL should change to show a more specific url. It is this URL that you want to copy/paste into the linky for any given linky party you want to enter.

Right click anywhere ON THE WORDS.
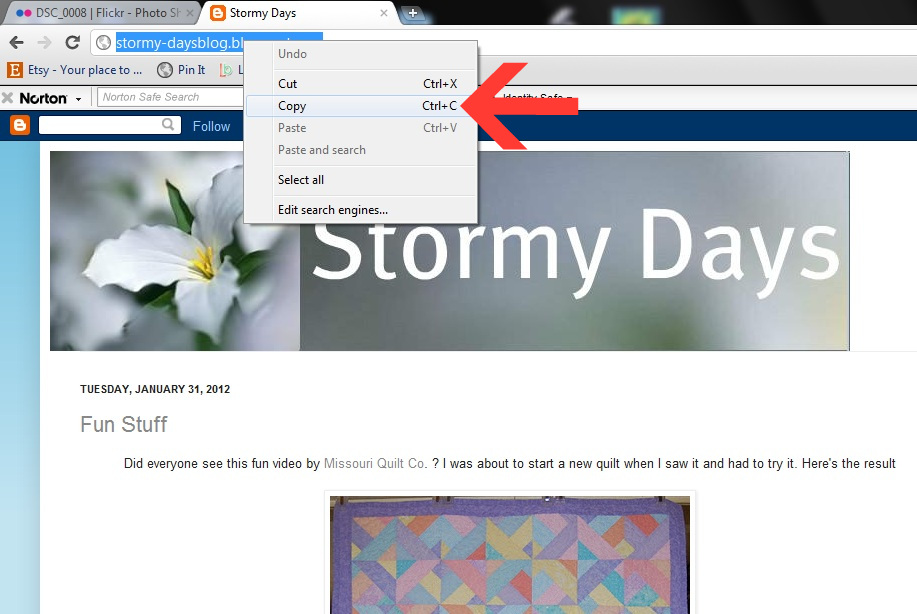
Left click on COPY.
Now you need to go to the linky on the blog post for the event you are entering. You can always find these by visiting the main page on this blog for your respective challenge as they have labels, underneath my blog header, labeled:
When you click on the respective page for the challenge you are entering, you'll always find links to the challenges that have been released. And, you are now ready for Step Two.
Step Two for Bloggers and non-bloggers
On the challenge page for the specific challenge you wish to enter, there will be a linky.
Click on the "Add your link" button, as shown in this image. After you click this button a form will appear.

2. Right click in the box labeled URL.

2. Right click in the box labeled URL.

3. Left click and your previously copied URL will be pasted in this box.

4. Click in the box labeled Name and type in your name or blog name, how you would like to be identified in this challenge. This name will be visible in the linky tool to others.
5. Click in the Email address and type in your email address. Your email address will not be visible to anyone, nor will it be shared with others. It is provided so that SewCalGal can contact you if you win a prize during these challenges.
6. Click Save.
Step One for Non-Blogger
As SewCalGal is currently hosting two different challenges this year, this tutorial assumes you know which challenge you are wanting to enter and can adapt these instructions accordingly.
A unique group has been setup for each of these challenges and you need to be sure you upload your photos to the appropriate group for the challenge you are entering:
or
1. Log in to your flickr account, or register for a free flickr account at www.flickr.com
2. Click on the Communities button > Search groups and type in the name for the appropriate challenge group (see above) and press return.
3. Click the Join Group button > join this group (you only need to do this step one time during the year. After you have joined a group you need not repeat this step when you upload photos for additional challenges throughout the year.

4. Click the Upload button to upload your photos.
5. Click Add to groups and then click on the appropriate group you wish to share your pictures.
6. Click on the Add Description under each photo and type in your description for your photo. Please read the rules first, to be sure you capture appropriate details for each challenge that you upload photos to enter. For example, for each challenge you'll want to clarify what challenge or show you are entering, your name, if it is your own design or who the designer is, and any other insights you feel appropriate to share.
7. Click upload >Upload photos
8. go back to the main page of flicker at www.flickr.com and in the upper right hand column

9. Click on the group for which you loaded your images, for the respective challenge
.
10. Click on the photo which you want to link and use to enter in the challenge. And you will see the url change as it now represents the url for this specific image.


11. Copy the url for the specific photo you want to enter in the challenge.
12. Go to the post on SewCalGal that has the linky for the challenge you wish to enter. Follow instructions from earlier in this post for "STEP ONE FOR BLOGGERS"
Step Two for Bloggers and Non Bloggers
Follow the directions for blogs from above and you should be fine.
After your link has been added to the linky you should be able to click on it and see what others see. The goals are different for bloggers vs non-bloggers:
After your link has been added to the linky you should be able to click on it and see what others see. The goals are different for bloggers vs non-bloggers:
Bloggers should link to a specific post, not a generic link to your blog. If all you see in the URL is the web address for your blog, as you add more blog posts your entry will get lost via the linky tool. Thus, your link could be removed without notification so you should go back to the steps above to verify you are copy/pasting a url that is more detailed, allowing it to go to your specific entry days, weeks or months down the road.
Non-bloggers should link to a specific image, not a generic link to the group. this will help others to click on your link in the linky and go directly to your image/entry even though other images may have been added to the group. If your link is not a link to your specific entry, you are at risk of having your entry removed from the linky. Thus, SewCalGal recommends you go back up to your step 1 and re-read and repeat steps that get you a more detailed url that will take people directly to your entry in days, weeks, months down the road.
Non-bloggers should link to a specific image, not a generic link to the group. this will help others to click on your link in the linky and go directly to your image/entry even though other images may have been added to the group. If your link is not a link to your specific entry, you are at risk of having your entry removed from the linky. Thus, SewCalGal recommends you go back up to your step 1 and re-read and repeat steps that get you a more detailed url that will take people directly to your entry in days, weeks, months down the road.
If you have questions, please email SewCalGal and I will try to help where I can. But unfortunately I do may not have the time to respond in a timely manner. If I get someone that wants to volunteer to help coordinate this, I will update this post here with an appropriate contact for such assistance.

3 comments:
Good info. I have used the linky tools before..bit not FLICKR. Learn something new everyday,
I'm happy to help anyone that needs it, feel free to refer them to the original post or directly to me.
I think it's quite clear.
Maybe I overlooked it, but I don't remember reading here about adding a link to your relevant post from my post. A link in the opposite direction, as it were. I know how to but it might be worth mentioning here too.
Post a Comment