Welcome to Day 2 of the EQ Blog Hop Celebrating A Year of Red and White Quilt Challenges!
Today, SewCalGal wants to encourage everyone to visit Kissed Quilts. Marlene is an amazing quilter who has used Electric Quilt Software to design many projects, including award winning quilts. And she has shared many excellent EQ tutorials on her blog, which are great resources for those interested in learning/improving their EQ skills, as well as being inspired with project ideas that you can create in EQ.
Today, I also want to share with you some ideas for using EQ7 to design your projects, as well as a tutorial that I hope will help some to learn/improve their EQ skills. I also have this theory that if you spend 15 minutes a day "playing" with EQ7, you'll be surprised how much fun you'll have and how much you will learn in a short time.
HOW TO CREATE A BLOCK IN EQ7


First, there are over 480 new blocks in the block library of EQ7. And, hundreds of other copyright free blocks that were available in previous versions of EQ Software. Plus, you can get more blocks from
- Blockbase has over 4,000 pieced block patterns!
While you can have endless fun with the blocks that are available for EQ software, quilters are blessed with the easy ability to design our own blocks. Thus, SewCalGal can honestly say that the possibilities for designing pieced or applique' blocks in EQ7 are endless! But today I'm going to show you how you use EQ7 to create your own block design, as well as to edit a block design that comes with EQ software to make it your own block design.
BASIC STARTING INSTRUCTIONS
Open EQ7.
Name a new project: Year of Red and White Quilt Challenge
Click OK.
CREATE A BLOCK
1. Click Block > New Block > Easy Draw Block from your top menu bar.
2. Set the block width and height to 12" x 12".

-
-
3. Click on the line tool
4. Use the line tool to draw a box on point within your block. This can easily be done drawing four single lines from each 6" point.
5. Click Add to Sketchbook

6. Click on the Color tab on your menu bar at the bottom.
Click on the paint brush and select fabrics/color choices for your block. I recommend you select white for the center square and a red for the four outside pieces.
7. Click Add to Sketchbook
8. Click on the Easy Draw tab. Using the line drawing tool draw lines to create four squares within the square, at the 6" points. Then draw lines to create half squares of this center square. Essentially you are creating the frame for half square triangles in the center square.
8. Click Add to Sketchbook
9. Click on the Color tab on your menu bar at the bottom.
Click on the paint brush and select the same red/white fabrics/colors you used in the previous block. Click on the pieces in this block to color with your choices to create a pinwheel effect.
10. Click Add to Sketchbook
11. Click on the Block > New Block > Easy Draw Black to draw a new block.
12. Use the line drawing tool to draw straight lines at the 2 1/2" mark around the outer area of the block.
13. Use the edit tool to click and delete some lines on the block to better reflect strip pieced assembly.
14. Color your block with same red/white fabrics used previously.
15. Click on Block button
16. Click the save icon
17. Click the file exit option on the main menu bar to save everything in your EQ6/EQ7 file. Tomorrow we'll work on turning these blocks (or others that you may want to use) into a red and white quilt design.
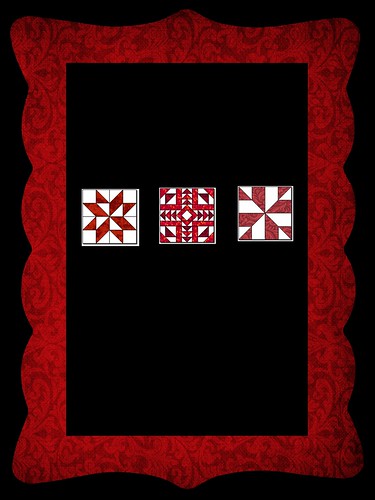
These are simple blocks created for the Year of Red/White Quilt Challenge. But you can adapt this tutorial to create many other pieced block designs. And, of course, you'll find more tips, tutorials and inspiration for making red/white quilts this week when you visit other bloggers participating in this blog hop. Don't forget today you'll want to visit Marlene @ Kissed Quilts.
Come back tomorrow for more tips and a tutorial on using your red/white quilt blocks to create a quilt in EQ6/EQ7.
Feel free to email me if you have questions on this tutorial, or the Year of Red and White Quilt Challenges.
Here is the line up for all the blogs that are participating in this EQ Blog Hop this week. SewCalGal hopes you'll visit all of the blogs and have fun, enjoy the tips and tutorials, as well as enter some of the giveaways that you may find. SewCalGal will also be sharing tips, tutorials and hosting a giveaway throughout this blog hop.
Monday, January 27th
- SewCalGal (where you are today)
Tuesday, January 28th
Wednesday, January 29th
Thursday, January 30th
Friday, January 31st


 First, there are over 480 new blocks in the block library of EQ7. And, hundreds of other copyright free blocks that were available in previous versions of EQ Software. Plus, you can get more blocks from


5 comments:
Good job, you make the basic directions very clear and easy to understand, thanks!!
hmm no comments? looks great :)
OKAY!!! I SOOO-SEW NEED THIS TUTE!! Thanks!! (can you just tell, by the all caps, that I'm excited!!! lol)
Ha!Ha! Funny, I was just taking a break from my EQ design by reading your blog! Ironic, eh? I'm inspired by the red and white challenge. I'm going to experiment with that one soon. Have a super day!
Thanks for the tutorial,
Post a Comment