Instructions are rough, but this is a simple design and I think those with basic quilting skills should be able to follow. But feel free to email me if you have any questions. As appropriate, I'll also try to update this simple tutorial to provide clarification and better details.
This is a fun design to create.
Tutorial for EQ7 Users
For those wanting to create this design in EQ7, you can adapt these steps to create just about any block size/quilt size that you are interested in. Insights shared in this tutorial are for a 42" block, that creates a 48"x48" wallhanging. But the block design is easily adaptable to a variety of sizes, to create an endless number of quilt designs.
Before I begin, I want to share that the Electric Quilt Company has many wonderful online lessons that are free. This lesson was leveraged from insights on their lessons, as I've learned so much about EQ from their free lessons, and their great reference books too.
BASIC STARTING INSTRUCTIONS
- Open EQ7.
- Name a new project: Breast Cancer Awareness Ribbon Quilt
- Click OK.
- Click WORKTABLE > Work on Quilt.
- Click QUILT > New Quilt > Horizontal.
- Click the Layout tab (at the bottom of your screen).
- Make the sizes here look like this:
Number of blocks:
7 Horicontal
7 Vertical
Finished size of blocks
Width 6.00
Height 6.00 - Click Add to Sketchbook

6. Click on the Borders tab (at the bottom of your screen).
7. In the Borders window select your border style of Mitred and set the left, top, right and bottom borders to 3.00.
8. Click on Layer 1 tab
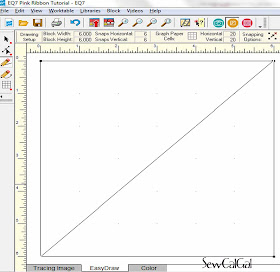
9. Click on Block button

11. Click on the line drawing tool
12. Draw a line that intersects to corners of your square block and draw a line from corner to corner to represent your HST block.

13. click on Add to Sketchbook.

14. Click on "work on Quilt " icon
15. Click on "Layer 1" tab
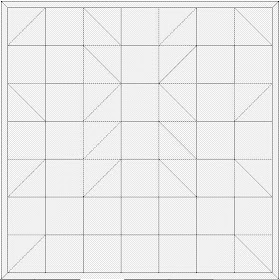
16. Click on "set Block button" and use your mouse to paint the blocks in your quilt layout for which ones should be solid blocks vs HST.
17. Click on the HST in the Sketchbook Blocks window.
18. Click on the squares in the quilt layout that need to be HST. e.g. R1-B1, R1-B3, R1-B5, R1-B7, R2-B3, R2-B5, R3-B1, R3-B3, R3-B5, R3-B7, R4-B3, R4-B5, R5-B1, R5-B3, R5-B5, R5-B7, R7-B1, R7-B7.
19. Click on the solid block in the Sketchbook Blocks window.
20. Click on the squares in the quilt layout that need to be solid squares. (every block that isn't a HST).
21. For the blocks in your quilt that are HST and need to be rotated, click on the button Rotate Block. Then click on the block in your quilt that needs rotating, until you have it rotated in the proper rotation.
22. Click the Rotate
23. Click on the paintbrush tool
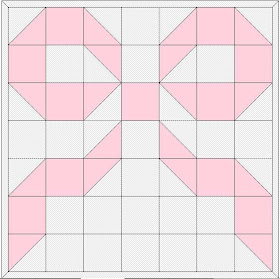
24. In the window for the Sketchbook Fabrics and Colors you can click on the tab for fabrics or colors and use the scroll bar, at the bottom of this window, to view more choices. Select a pink color (or pink fabric) to paint the ribbon part of the blocks.
25. In the window for the Sketchbook Fabrics and Colors select a white and click on the remaining blocks and borders.
26. Click the save to Sketchbook.

27. Click the save button.
Congratulations. You have now created a pink ribbon quilt/block in EQ7.
To print Fabric Requirements, Click File, Print, Fabric Yardage and Print.
Pink Ribbon Quilt -Tutorial:
Note: Instructions are provided to create two different sizes: 1) the 48"x48" wallhanging as shown above, and 2) a 14" finished block using 2" Finished half-square triangles.
Wallhanging:
Create 20 white 6.5" squares by cutting 4 strips of fabric that are 6.5" the width of your fabric and subcut into 6.5" squares to create 20-6.5" squares.
Create 10 pink 6.5" squares by cutting 2 strips of fabric that are 6.5" the width of your fabric and subcut into 6.5" squares to create 10-6.5" squares.
Create 16 pink/white 6.5" HST by cutting 3 strips of pink fabric and 3 strips of white fabric that are 7.5" wide and subcut to create 16-7.5" squares.
Create 3.5" borders by cutting 5 strips of white fabric 3.5" wide. As quilt final measurements are 48" you'll need to subcut one of the strips in 1/4 and piece this short strip to the other four strips, to create the border strips.
Create the HST triangles by pairing a white 7.5" square with a pink 7.5" square. Stack evenly on top and draw a line from corner to corner, to identify the two triangles. Sew 1/4" seams on both sides of this line. Use your rotary to cut along the line you marked, to separate the two HST. Press the HST to create a block. Repeat for all 16 HST. Use a square up ruler to trim these HST to create a perfect 6.5" square.
Layout the rows of your blocks with solids and HST to create the pink ribbon. As appropriate, sew your blocks together to create rows, and your rows together to create your quilt top. Then add your borders.
Congratulations, you've finished your Pink Ribbon Quilt Top.
To adapt this design to make a 14" finished block
Create 20 white 2.5" squares by cutting 4 strips of fabric that are 2.5" the width of your fabric and subcut into 2.5" squares to create 20-2.5" squares.
Create 10 pink 2.5" squares by cutting 2 strips of fabric that are 2.5" the width of your fabric and subcut into 2.5" squares to create 10-2.5" squares.
Create 16 pink/white 2.5" HST by cutting 3 strips of pink fabric and 3 strips of white fabric that are 3.5" wide and subcut to create 16-3.5" squares.
Create the HST triangles by pairing a white 3.5" square with a pink 3.5" square. Stack evenly on top and draw a line from corner to corner, to identify the two triangles. Sew 1/4" seams on both sides of this line. Use your rotary to cut along the line you marked, to separate the two HST. Press the HST to create a block. Repeat for all 16 HST. Use a square up ruler to trim these HST to create a perfect 2.5" square.
Assemble to create the ribbon block, following assembly instructions above (excluding border).
AccuQuilt Tutorial for Pink Ribbon Quilt:
AccuQuilt has a variety of die sizes for squares and half-square triangles, making it very easy to adapt this design to a variety of block sizes. The 6" square and half-square triangle results in a nice size ribbon that can create a beautiful wallhanging or center block to a quilt.
To create the Pink Ribbon Wallhanging:
Cut 20 2" finished HST triangles with die #55001 with white fabric
" " " " " " " " " " pink "
Cut 11 6.5" finished squares with die # 55009 with pink fabric
" 20 " " " " " " " white fabric"
Cut 5 3.5" strips, the width of fabric, with die #55032 with white fabric.
Sew the pink/white HST together using 1/4" seams. Press to create HST blocks
Layout your blocks for the order of the pink ribbon design. Sew your blocks together to create rows. Show your rows together to create the quilt top. Sew your border strip on to create the borders.
Congratulations, you've finished making your Pink Ribbon Wallhanging Quilt.
Note: Depending on your interest, you can finish blocks to create pillows, wallhangings, quilts. Add sashing and borders, where appropriate.


I don't have any of those fancy gadgets, SO I really appreciate you sharing!
ReplyDeleteThank you very much!
YOU ARE GOOD!!! Love the tutorial. All the time and photos....excellent job!
ReplyDeleteSmiles,
Kelly
I have a Mac so I have Quilt-Pro. Can't use your tutorial but I might have similar steps in my Quilt-Pro.
ReplyDelete