
Teri Lucas was our FMQ Expert for our October Challenge where she provided a wonderful tutorial. And, you may remember that she generously offered to come back and share with us another tutorial,as our final "bonus" tutorial. Well, today is the day we can share this tutorial with all of the participants in the 2012 FMQ challenge.
We've been lucky to have wonderful FMQ Experts share a variety of FMQ techniques, tips and tutorials. And, the tutorial that Teri is sharing with us today is one that definitely will surprise you and I hope also delight you. I think it is an excellent way to create spectacular quilts, wallhangings, table toppers and other projects and that will also allow you to show off your FMQ skills.
This technique does rely on using very easy to use, and inexpensive, software from Kaleidoscope Collections (aka KK). I am also a big fan of KK software and excited that Teri's tutorial incorporates using KK to create beautiful FMQ projects. But, don't worry, if you don't have this software you can still benefit from this tutorial.
Before I share Teri's tutorial with you, I'd like to share insights about the Kaleidoscope Kreator 3 Software and why I recommend it.

This software is very easy to download, install and use. You can easily turn any image or clipart into an amazing Kaleidoscope that can be printed on to fabric, as well as used in a variety of ways (e.g. creating clipart for blogs, facebook, greeting cards, etc). You can also create images that are easy to pull into EQ7 software to design your projects using blocks with beautiful Kaleidoscope designs that you create and are unique to your designs.
I had fun playing with clipart that I used in the Quilter's Christmas Party. It was fun to turn the Santa into a Kaleidoscope design.

With each image there are so many variations one can create using KK software, the possibilities are endless. I'm currently playing with my Santa clipart design to create designs that I'll print on printable fabric sheets, on my home printer. Then, I will turn them into a fun project that I want to add FMQ to. As such, I thought I'd show you some of the Kaleidoscopes I created all from that clipart! I'm planning on printing them on fabric to create a table topper.

Here are some examples of how KK software can help you create spectacular quilts:

{above} The Feather Zone made using KK software and the Feathers Template Mini-Pack. You can find out more about this quilt at the KK blog.

{above} Snowflakes Quilt made using KK software and the Snowflakes Template Mini-Pack. You can find out more about this quilt at the KK blog.

The KK blog is full of inspirational projects. Click here to see more insights on an amazing project made with KK software. Very inspirational. Clearly, the possibilities with KK software are endless.

Ok, you can probably tell that I love KK software and see various possibilities. Time to move on and share this tutorial with you.
Suggested Supplies for this Tutorial:
- Kaleidoscope Kreator 3 which will allow you to create your own designs to incorporate into your quilts. And, wouldn't it be fun to create a quilt that has a feathered motif printed on fabric that was created using your photos or clipart? Definitely a one of a kind piece of artwork! But, for those that do not have, or want to purchase KK software, there are a couple of ways you can still take advantage of Teri's tutorial. While you won't have as much fun as those that have KK software, you'll still have fun creating FMQ feathers in a Kaleidoscope shape. Here are some options.
Click here to download and print PDF of this design, provided by Jeanie of Kaleidscope Collections that incorporates the Feathers Template pack, if you wish to do this FMQ tutorial and do not have or want to purchase the suggested software tools that will allow you to create your own version of this design.

OR use this image as a stencil to make the feathered design by Teri on your sandwich. For those doing the optional Sampler Quilt, if you still have an 8"x8" square that needs to be quilted, this feathered motif would also look great in that square. If you need help sizing it, email SewCalGal. But, I do think everyone will have more fun using the KK and Feathered pack software to create their own feather design and print it on fabric for this challenge.

- Feathers Template Pack will allow those with KK software to take any image and create their own feathered design that they can print on fabric and use with this tutorial and SewCalGal thinks you'll have the most creative fun with this tutorial, if you use the KK software and Feathers Template. I'm certainly planning on purchasing the Feathers Template to do this tutorial as well as create other designs and projects too. While I truly love KK software, this design pack just seems to be calling out to those that enjoy FMQ.
- Inkjet Fabric (pre-treated fabric sheets). There are many brands on the market (e.g. Jeanie Sumrall-Ajero and SewCalGal recommends EQ Printables Premium Cotton Lawn as it produces the best results (e..g vibrant colors and good contrast). Jeanie shared that if you want to treat your own fabric,she recommends Bubble Jet Set with Robert Kaufmann’s Radiance (55% cotton/45% silk). Your local quilt shop, sewing center, or favorite online quilt shop may also sell various sheets of fabric that you can run thru your home printer. Pick up a package and give this tutorial a try. I'm sure you'll enjoy doing FMQ on printable fabric and quickly agree the possibilities are endless.
- And, of course, normal free-motion quilting supplies.
The Inkjet Fabric sheets are typically 8 1/2"x 11" and designed to work on typical inkjet printers that one would find in most homes.
Due to the size, you may want to think ahead as to what you might want to create with this project (e.g. pillow, table topper, etc.). As an 8 1/2"x11" quilt sandwich is not an easy size to manage while doing FMQ, you may want to turn this fabric sheet into a larger sandwich before you proceed with the FMQ tutorial.
There are many excellent videos tutorials and inspirational videos on youtube for KK software that you may want to watch. Here is one that helps to provide a introduction to this software and I think you'll see how easy it is to use.
Tutorial for Free-Motion Quilting, by Teri Lucas:
Feathers continue to be the hallmark of our skill as
quilters whether by hand or machine, they are beautiful where ever they are
stitched out. Feathers without a stencil
stumped me until I watched Ricky Tims demonstrate one of his techniques for
stitching out feathers. The very next
quilt used this method with great
success however sometimes I'd like to be able to stitch out feathers keeping
the center spine a little thinner or get a different look altogether.
Over the last couple of years I've had the privilege of
quilting for Jeanie Sumrall-Ajero of Kaleidoscope Collections. We met while
taping for Quilitng Arts TV in 2009, a little while after that Jeanie asked me
to be her quilter. A little over a year
ago Jeanie watched Linda Taylor videos on The Quilt Show website in order to
learn about feather shapes, sizes and how Linda stitches them out. Linda gives lots of clear guidance in these
videos. Jeanie then took all of this
information and developed an add-on to the Kaleidoscope Software to incorporate
kaleidoscopic feathers into our quilts.

As a general rule Jeanie and I work independently from one
another however, we email like mad when we’re stuck and need confirmation that
we’re going in the right direction. The
photos of where she was going with the feathers made my heart sing getting the
quilt itself was even more exciting because I would get to play. After quilting Feather Zone (photo of Jeanie
& me with the quilt) I commented to Jeanie that this is the best way EVER
to learn how to machine quilt feathers, everything that a quilter needs is
right here – a variety of shape & size.
So what’s the tutorial?
Click.

Print.

Stitch


It doesn’t get any simpler than that.
Okay you’re right it’s a bit more complicated however Jeanie
can handle the technical stuff with the software I’m going to offer the
following tips
Tip #1 Get the Kaleidoscope Creator and the “Feathers”Template Pack and create your own design. Or, download this PDF (same PDF mentioned in the Recommended Supplies list above) and print it on fabric to use for your sample in this challenge.
Tip #2 Install and start creating your own feathers with the
templates that Jeanie sells at Kaleidoscope Collections.
Tip #3 Print out several copies of a feather shape that you
like.
Tip #4 Place a piece of clear vinyl (report cover), vellum
or acetate over the feather shape and trace around the lines with a water
soluble pen. Practice “stitching”. This helps develop muscle memory in your
hands. Since we’re stitching on a
domestic it’s important to trace over with both hands.
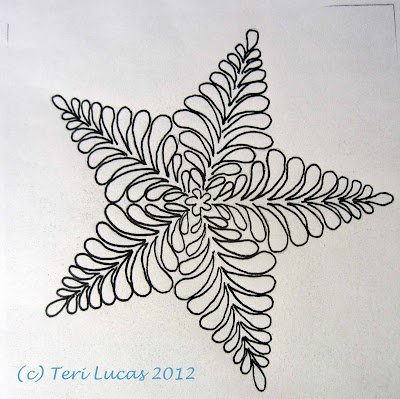

{above} feather traced on paper

{above} Feather traced on acetate

Tip #4a Add fills in the feather shapes in a different
thread color and weight for added interest.
Tip #5 As you stitch the feathers try not to move the
direction of the quilt. This will allow
you to get the rhythm of stitching multi-directionally and in odd shaped places.
Tip #6 – Enjoy the process of learning, it’s going to take
time to figure out the style of stitching that is going to work for you.
Tip #8 – The only way to improve stitching out feathers is
to spend time at the machine stitching.
Tip #9 – Choose your batting when doing feathers for how you
want them to look. If you want them to
just be then choose a low loft cotton or bamboo. If you want a trapunto look go for medium/high
loft polyester, wool or silk as they give more relief when stitched heavily
around.
Tip #10 – If you don’t have the Kaleidoscope Kreator there
are several good books and you tube videos on stitching out feathers. I'm also sharing a handout (click here to download) that shows how to create feathers in four easy steps.
And remember, feathers can be used where your heart sees fit
to place them on your quilt


BONUS TUTORIAL OVERVIEW
While this challenge is focused on learning and/or improving our free-motion quilting skills, you also have the opportunity to win prizes. To be eligible to win a monthly prize, simply complete this "bonus" tutorial anytime in 2012 and it can count as 1 of 12 FMQ tutorials that you need to complete to enter to win a Grand Prize.
Jeanie Sumrall-Ajero of Kaleidoscope Collections is sponsoring a giveaway for this challenge where
one lucky winner will receive a copy of the Kaleidoscope Creator software.

and a copy of the the Feathers Template Pack.
But do remember this challenge is more about learning and improving your FMQ skills, so don't rush thru the exercise just to enter. Take time to practice and embed this design to your muscle memory, before you enter. To clarify, DO NOT just add a link to your blog, but to your post that shows that you have completed this tutorial. You get one link, so keep practicing until you feel you are finished with this tutorial.
For bloggers:
Please post your entry on your blog. To clarify, you can include as many photos of this tutorial exercise in your post, but you can only add one link to the linky tool below. You may also want to include insights in your post about your past FMQ experience and thoughts about this tutorial. Totally, optional, but you may also want to let everyone know that you have taken the Pledge and you did this exercise to enter the the challenge this month, where randomly selected winners will win a prize. You may inspire others to want to join this challenge too!
For non-Bloggers:
1) You will need to have a Flickr account (www.flickr.com).
2) Upload your photos for this month's challenge to Flickr, batch organize, send your photos to groups, select "2012 FMQ Challenge". While Flickr, limits the amount of text you can share in your description, feel free to share your perspective on this exercise and/or your past FMQ experience, if you wish.
3) After your photos have successfully been loaded to the "2012 FMQ Challenge" group, click on your best photo in that group, ideally one that shows the stencil and how you quilted using that stencil. Copy the URL link to your particular photo entry. Add that link to the linky tool below, to officially enter.
note: While there was a unique group for each monthlychallenge, based on feedback the generic 2012 FMQ Challenge group was been created that will hold all your photos for the remaining monthly challenges, so you will not need to rejoin a group on Flickr every month.
Remember only one link (entry) per person that has taken the pledge to learn and/or improve their Free Motion Quilting Skills, on a home sewing machine, in 2012.
For those that may need help to link up the link to their tutorial project, to the linky for this challenge, Dana (Stormy Days) has also written an excellent tutorial for using linkies, so please take time to read her tutorial if you are not familiar with linkys or have any questions about linkys, in general. Please read the rules above, before you enter by way of adding a link below. And, Only add one link after you have practiced the tutorial to master the design. No rush, you have all month to practice and enter. Please follow the rules on this tutorial post, before you add a link.
Add your link once you complete Teri's tutorial for a feathered kaleidoscope. This link will be open thru January 15th.
You can find Teri at:
http://www.kaleidoscopecollections.com
For those attending the upcoming Road to California Quilt Show, do look for Kaleidoscope Collections booth #3H. Great opportunity to get a demonstration and learn more about this super fun software and how you can use it to make quilts and many other items too! SewCalGal loves it!
 Road to California
January 24-27 2013
Ontario, CA USA
Road to CaliforniaJanuary 24-27 2013
Ontario, CA USA
Copyright Reminder: This site is copyright protected. You are certainly authorized to print and use this tutorial for your own use. Please DO NOT print and share any part of this tutorial post, nor share electronically, without written permission from Teri Lucas and SewCalGal.

6 comments:
Wow this looks fabulous - thank you so much both of you, I look forward to playing!!
Oh, this looks like such fun, and so perfect for the season! I've just got to add this to the list. Thanks to both of you for this great tutorial!
I love it, and will be looking forward to giving it a try!
You know I'm all over this! I love Kaleidoscope Kreator....thanks to you to turning me on to it.
Excellent post!
Thanks
Kelly
This is beautiful, I am definitely going to try this, thanks!
THIS is SOOO cool!!
Post a Comment